-
Jayesh Limaye
24th Sep 2012
Windows 8 Consumer Preview was recently launched and its download story evoked quite a lot of interest, because it is uniquely different from its predecessors. It has a certain amount of freshness due to the radically different interface known as Metro UI, which is similar to that of the Windows Phone OS. Yet another feature that was much talked about even before its release was that the OS will be able to run directly off a USB drive (flash drives as well as hard drives). This feature will be very interesting to a lot of people. Computer repair professionals will find it very useful to take such a drive and simply plug into an affected computer to troubleshoot and fix problems. Others will find it helpful too, because you can easily take your personal data and settings with you, along with the whole operating system. We will show you how you can prepare such a bootable drive.
Requirements
- USB drive with at least 16 GB capacity.
- A computer running Windows 7.
- Windows 8 Consumer Preview ISO images.
- Windows Automated Installation Kit (WAIK) for Windows 7.
- MagicISO Virtual CD/DVD-ROM (MagicDisc).
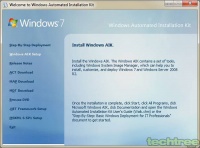
Step I Download all the above mentioned software. You can opt to download either the 32-bit or the 64-bit ISO of Windows 8. Download and install the MagicDisc software. Right-click on its system-tray icon, go to Virtual CD/DVD-ROM, and click Mount. You can then browse to the WAIK image you have downloaded and load it up. Let it autorun, or load StartCD.exe. Select Windows AIK Setup from the left of the screen to start installing WAIK to your hard drive. This is necessary because we need the file ImageX Tool for Windows that gets installed in the process. This file helps copy Windows 8 files to the USB drive. Unmount the WAIK image from MagicDisc.
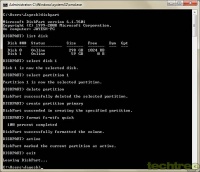
Step II Next, plug in your USB drive and open the command prompt by typing CMD in the Run box (<WINKEY> + <R>). We will now run a command-line disk management utility with low-level access to the hardware. Type diskpart and press <ENTER>. Type list disk to list the storage drives installed in your computer. Note the number against the USB drive you just plugged in (here, it is Disk 1). Type select disk 1 to select this drive. Type the following commands and press <ENTER> after each:
select partition 1
delete partition
create partition primary
format fs=ntfs quick
active
exit
Step III
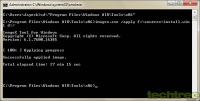
This will exit the utility and leave you at the command prompt again. Now, load the Windows 8 Consumer Preview ISO image into MagicDisc. Locate the ImageX Tool. This is a file named imagex.exe, located in different folders of the WAIK installation. Depending on what version of Windows 7 you have, you can use the one located in C:\Program Files\Windows AIK\Tools\x86 for the 32-bit version, or C:\Program Files\Windows AIK\Tools\x64 for the 64-bit. Assuming you're running a 32-bit version, type the following at the command prompt and press <ENTER> after each:
cd\ "C:\Program Files\Windows AIK\Tools\x86"
imagex.exe /apply f:\sources\install.wim 1 d:\Here, F: is the virtual drive where the Windows 8 image has been loaded (the source), while D: is the USB drive or the destination. Windows files will start getting copied to the USB drive. Depending on the speed of the drive and the USB port, it will take some time for this process to complete. In my case with USB 2.0, it took a little over 17 minutes.
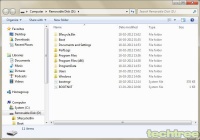
Step IV Once copying is complete, there's only one more step left — make the drive bootable. Windows 7 has a utility known as bcdboot.exe to take care of this. Just run bcdboot.exe d:\windows /s d: and you're done. Make sure the drive has the files shown in the adjoining screenshot.
Congratulations, your Windows 8 bootable drive is ready! You can now plug it into the USB port of any computer and boot into the spanking new OS without having to install it. Just make sure you set the computer to boot through the USB drive instead of the hard disk. This is done by pressing a key (usually <ESC>, <F9>, <F10>, or <F11>) as soon as the computer powers on. In my case, it took around 25 seconds to boot to the Start screen. Your results may vary. Let us know about your experience in the comments below.
It took just 25 seconds to arrive at the Windows 8 Start screen!
Guide: How To Run Windows 8 Off A USB Drive | TechTree.com
Guide: How To Run Windows 8 Off A USB Drive
Take your OS with you wherever you go!
News Corner
- DRIFE Begins Operations in Namma Bengaluru
- Sevenaire launches ‘NEPTUNE’ – 24W Portable Speaker with RGB LED Lights
- Inbase launches ‘Urban Q1 Pro’ TWS Earbuds with Smart Touch control in India
- Airtel announces Rs 6000 cashback on purchase of smartphones from leading brands
- 78% of Indians are saving to spend during the festive season and 72% will splurge on gadgets & electronics
- 5 Tips For Buying A TV This Festive Season
- Facebook launches its largest creator education program in India
- 5 educational tech toys for young and aspiring engineers
- Mid-range smartphones emerge as customer favourites this festive season, reveals Amazon survey
- COLORFUL Launches Onebot M24A1 AIO PC for Professionals


Reader Comments (41)